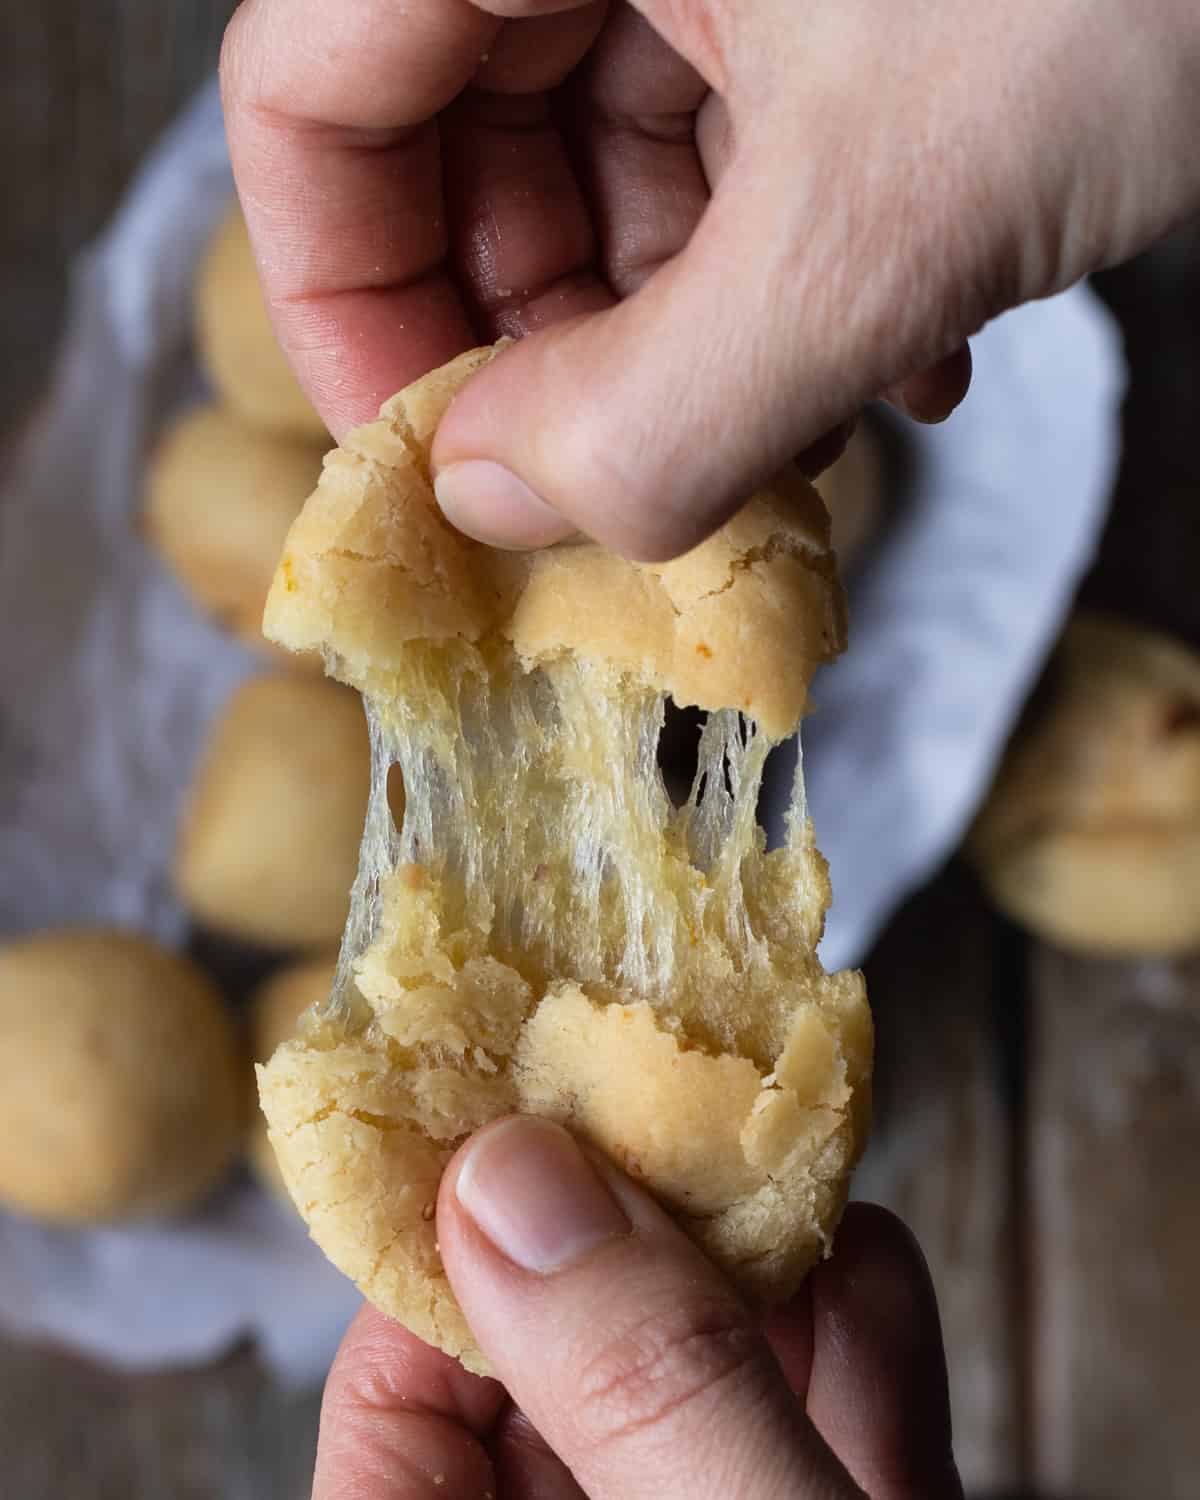
This vegan pão de queijo (vegan Brazilian cheese bread) has the crispy golden crust, chewy interior, and stretchy texture of traditional Brazilian cheese bread—but without the dairy. Made with tapioca flour, mashed potato, and nutritional yeast, it’s naturally gluten-free and never turns out dry or hollow.
The content provided is for informational purposes only and is not intended to serve as medical advice. For more details, please refer to our disclaimer page.
2025-02 Update: Refined tips, improved instructions, and updated content for a better user experience.
✋🏼E aí, pessoal! Hey there, friends!
Let’s talk about one of Brazil’s most iconic snacks—pão de queijo. If you’ve ever had it, you know why it’s a big deal: a crispy golden crust, a chewy interior, and a rich, cheesy flavor that makes it impossible to eat just one. Found in bakeries, street vendors, and family tables across Brazil, it’s a typical Brazilian snack that everyone loves.
I grew up in São Paulo, Brazil, eating pão de queijo with my family—fresh out of the oven, paired with coffee or as an afternoon snack. It’s one of those comfort foods that feels like home. But when my son and I went dairy-free, I needed a way to bring back that authentic taste and texture—without the cheese.
This vegan Brazilian cheese bread keeps everything you love about the traditional Brazilian cheese bread recipe. It bakes up with a golden, crispy crust, giving way to a soft, chewy interior with just the right stretch. The secret? Mashed potato and nutritional yeast, which create that savory depth and cheesy flavor, all while staying completely dairy-free.
And the best part? This vegan pão de queijo is naturally gluten-free, easy to make, and perfect for mixed-diet households. Whether it’s your first time making pão de queijo or you’re looking for an easy, dairy-free alternative, this recipe delivers on flavor, texture, and simplicity.
👉 Want more Brazilian recipes? Pair this pão de queijo with a classic Brazilian Caipirinha, or a comforting plate of Brazilian rice and beans for the full experience!
😍Why You'll Love This Recipe
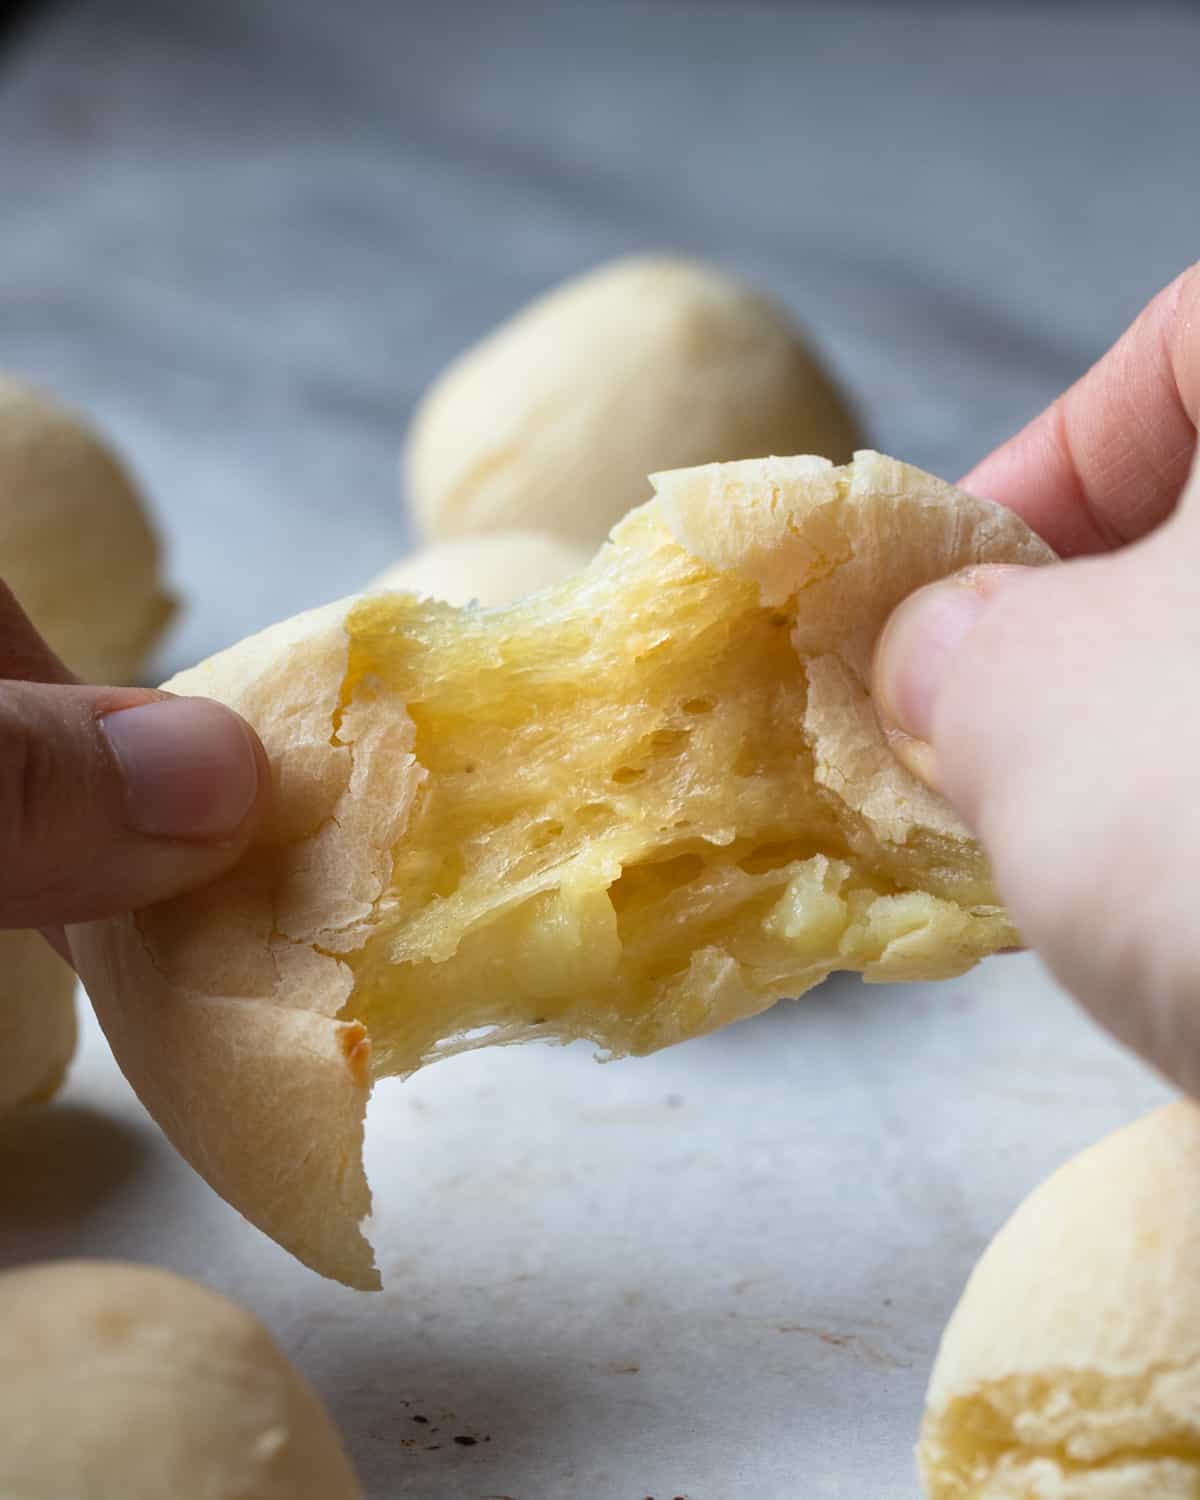
- Crispy Outside, Chewy Inside: Just like traditional Brazilian cheese bread, with a golden crust and stretchy texture inside.
- Tastes Like the Real Thing: As a Brazilian, I made sure this vegan version keeps the authentic flavor you love.
- No Complicated Ingredients: Tapioca flour, mashed potato, and nutritional yeast create the cheesy taste—without dairy.
- Easy & Foolproof : No hollow centers or dry dough—just a tested recipe that works every time.

🥖What is Pao de Queijo?
Pão de queijo is a traditional Brazilian cheese bread from Minas Gerais, Brazil, loved for its crispy outside, chewy interior, and stretchy texture. It’s naturally gluten-free, made with tapioca flour (or cassava flour) from cassava root instead of wheat. When wheat flour wasn’t widely available, Brazilians turned to tapioca flour, a gluten-free starch. As cheese production grew, it was added, creating the chewy, cheesy pão de queijo we know today.
In this dairy-free version, we’ve only replaced the cheese with a mix of mashed potato and nutritional yeast. The potato keeps the soft, stretchy texture, while nutritional yeast adds a savory, cheesy bite—without dairy.

🥖Ingredient and Flavor Notes
This vegan pão de queijo keeps everything you love about traditional Brazilian cheese bread—a chewy interior, stretchy texture, and crispy golden crust—but without the dairy. Here’s how each ingredient plays a role:
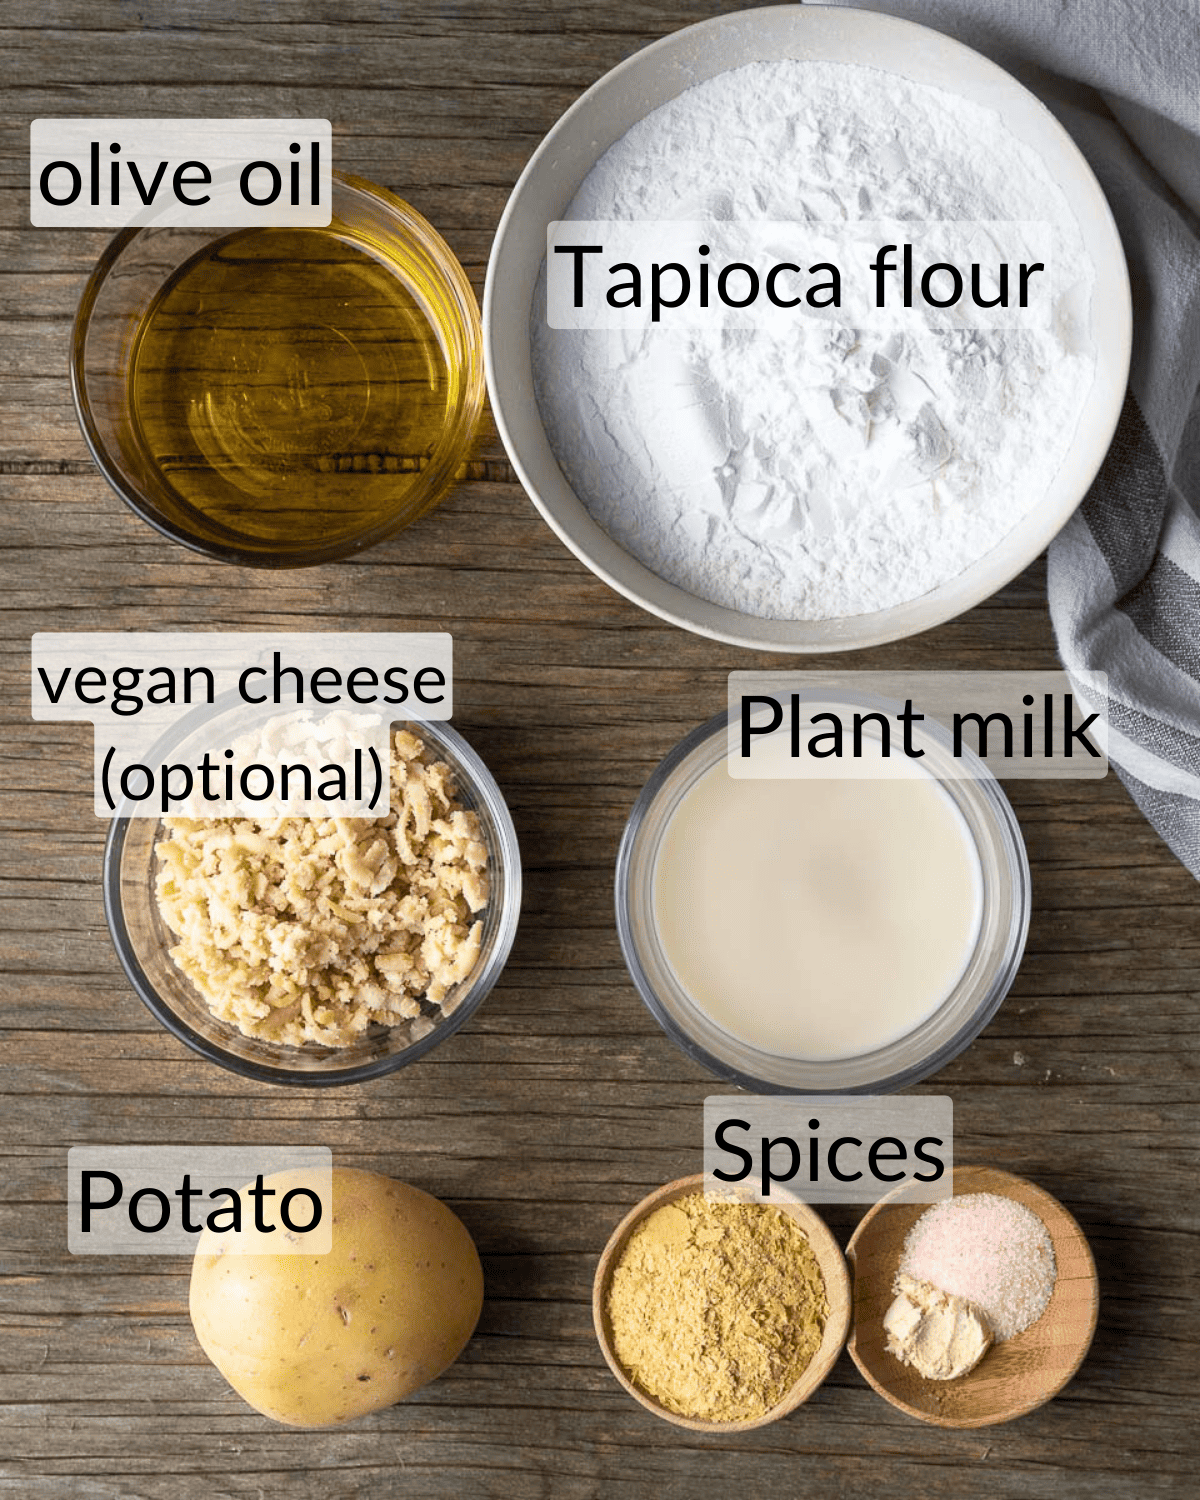
- Tapioca flour (or cassava flour): The essential ingredient for the chewy texture. Tapioca flour, made from cassava root, gives pão de queijo its signature stretch and is naturally gluten-free. I use Bob’s Red Mill, but any brand works.
- Cooked potato: Mashed potato mimics the starchy, stretchy texture of melted cheese, keeping the dough soft and airy. This also adds natural moisture, so the bread doesn’t dry out.
- Nutritional yeast: This is how we create that savory, cheesy bite—without actual cheese. It adds depth of flavor and keeps the authentic taste of the original recipe.
- Plant-based milk: I tested this recipe with oat, almond, and soy milk—all work well. The non-dairy milk helps blend the dry ingredients into a smooth dough.
- Olive oil: I use extra virgin olive oil because of its neutral flavor.
- Garlic powder and salt: These simple seasonings round out the flavor, just like in a traditional Brazilian recipe. A little goes a long way!
- Vegan cheese (optional): For an extra cheesy flavor, you can add a few tablespoons of soft dairy-free cheese. Stick to artisan-style brands like Culcherd or Miyoko's Creamer—avoid processed vegan cheeses, which don’t melt the same way.
For recipe quantities, see the recipe card
⚠️Gluten-Free Reminder for Celiacs: While tapioca flour and potato starch are naturally gluten-free, always check labels for cross-contamination if you have Celiac disease.
🔁Ingredient Substitutions
This recipe relies on specific ingredients for its chewy interior and crispy crust, so substitutions are limited. Here’s what works:
- Plant-Based Milk – Any unsweetened non-dairy milk works (oat, almond, soy). Avoid coconut milk, as it changes the flavor.
- Olive Oil – You can swap for avocado oil or extra virgin options for a neutral taste.
- Tapioca Flour – Non-negotiable! It’s the key to the stretchy texture. Other gluten-free flours (like almond or rice flour) won’t work.
- Mashed Potato – Stick with starchy potatoes like russet. Sweet potatoes or low-starch varieties won’t give the right consistency.
- Need to adjust seasonings? Feel free to add onion powder, black pepper, or a pinch of red bell peppers for extra flavor.
👩🏽🍳Instructions: Step-by-step guide
Step 1: Preheat and Prep
Preheat your oven to 350°F (175°C). Bring a pot of salted water to a boil. In a medium glass bowl, add the tapioca flour (or cassava flour).
Step 2: Heat Wet Ingredients
In a saucepan over medium-high heat, combine water, olive oil, plant milk, and salt. Heat until small bubbles form—but don’t let it boil. Slowly pour this hot liquid mixture over the tapioca flour, stirring immediately.
Step 3: Make the Pao De Queijo Dough
Mix until the tapioca mixture becomes sticky and stretchy. Cover with a kitchen towel and let it rest for 10 minutes. This step helps the flour absorb moisture, creating the right chewy texture.

Step 4: Prep Potatoes
While the dough rests, peel and dice the potatoes. Cook them in boiling salted water until fork-tender (about 10-15 minutes). Drain and mash well with a fork, potato masher, or ricer until completely smooth.
Step 5: Add Potaotes to Dough
To the rested dough, add the mashed potatoes, nutritional yeast, garlic powder, and salt. Mix well until fully incorporated.
📌 Vegan Cheese Option: If using vegan cheese, grate and add it now. Reduce the mashed potato amount slightly (see recipe card for exact measurements).

Step 6: Knead the Dough.
Lightly dust a clean countertop with tapioca flour. Transfer the dough to the floured surface and begin kneading. If the dough sticks to your hands or countertop, sprinkle a tiny bit more tapioca flour, but don’t overdo it—too much can make the dough dry.
Step 7: Shape and Bake
Roll the dough into 1-2 inch small balls and place them onto an oiled parchment paper or baking sheet. Bake for 30-35 minutes until golden brown and slightly crispy on the outside.
📌 Size Tip: Make them bite-sized for a snack or slightly larger for a more traditional pão de queijo feel.

💡Recipe Tips For Success
- Use the Right Vegan Cheese – Stick to artisan brands like Culcherd or Miyoko's Creamery for the best results. Processed cheeses won’t work the same.
- No Substitutes for Tapioca Flour – It’s the key to the chewy texture—other flours won’t work.
- Prevent Hollow Centers – The dough should be moist, not dry. If your pão de queijo turns out hollow, your dough was too dry. Use slightly less tapioca flour or add 1-2 teaspoon extra water.
- Let the Dough Rest – This hydrates the tapioca, making the dough easier to work with and improving the final texture.
- Check Dough Consistency – It should be stretchy and slightly oily, not sticky. If it sticks, add a tiny bit of tapioca flour—too much will dry it out.
💡Note About Vegan Cheese
Not all dairy-free cheeses work in this recipe. For the best results, use an artisan-style vegan cheese like Culcherd or Miyoko’s Creamery—these melt well and enhance the chewy texture. Avoid processed brands like Daiya, which can make the dough too gummy or oily.

🥡Storage
- Fridge: Store leftover vegan pão de queijo in an airtight container at room temperature for up to 3 days or in the fridge for up to 5 days to keep the chewy texture.
- Freezer: Freeze in a single layer on a baking sheet, then transfer to a freezer-safe bag or container for up to 3 months.
- Reheating: Bake at 350°F for 5-10 minutes until warm and crispy again—no need to thaw frozen ones first!
🌴More Brazilian Recipes
Want to explore more Brazilian recipes? These classic dishes bring the flavors of Brazil straight to your kitchen:
- Brazilian Rice and Beans – A staple meal that pairs perfectly with just about anything.
- Vegan Brigadeiro – The classic Brazilian chocolate truffle, made dairy-free.
- Brazilian Vinaigrette (Vinagrete) – A fresh salsa-like topping that goes great with grilled foods.
- Air Fryer Yuca Fries – Crispy on the outside, soft on the inside—perfect for dipping!
👉Browse more Brazilian recipes here!

Born in Brazil and now raising a mixed-diet family, I’ve spent years perfecting gluten-free, dairy-free recipes without compromising on texture or flavor. Inspired by my Brazilian roots and background in neuroscience, I create comforting, allergy-friendly meals that work for busy households—because good food should be for everyone.
❔FAQ
No, tapioca flour (or cassava flour) is essential for the chewy texture. It’s what gives pão de queijo its signature stretch. Other flours won’t work the same way, so substitutions aren’t recommended.
If your vegan Brazilian cheese bread is too firm, check your liquid-to-tapioca flour ratio. Too little liquid makes the dough dry. Ensure it’s slightly moist and well-rested before baking.
Too much tapioca flour or not enough liquid can cause hollow centers. Resting the dough properly before baking also helps prevent this issue.

🌟 Loved this vegan pao de queijo recipe? Let us know! I’d be thrilled if you could leave a comment, star rating, or share our vegan Brazilian cheese bread recipe. Your feedback helps support and improve AtMyTable and helps others discover new favorites. Or come chat with me on Facebook or Instagram!
🥣Recipes to Pair With Pão de Queijo
Pão de queijo is delicious on its own, but here’s what to serve it with for the ultimate snack or meal:


👋🏼Até logo, amigos! Keep savoring every bite of our brazilian cocktail recipe and don’t forget—life’s better with a little flavor and fun. Até a próxima!
📖 Recipe

Vegan pao de queijo, Brazilian cheese breads
Ingredients
- 2 cups tapioca flour 250g
- ¾ cup cooked russets potato peeled and diced (about 2-3 small potatoes)
- ½ cup water
- ¼ cup plant milk oat, almond, or soy
- ⅓ cup olive oil
- 1 teaspoon salt
- 4 tablespoon nutritional yeast
- 1 teaspoon garlic powder
Cheese version:
- ¼ cup vegan hard cheese Use an artisan-style vegan cashew cheese brand.
Instructions
- Prep: Preheat oven to 350°F and boil a pot of salted water. Add tapioca flour to a glass bowl.2 cups tapioca flour
- Heat Wet Ingredients: In a saucepan over medium-high heat, combine water, oil, plant milk, and salt. Heat until small bubbles form (don’t let it boil), then slowly pour over the tapioca flour. Stir with a wooden spoon until the dough becomes stretchy.½ cup water, ¼ cup plant milk, ⅓ cup olive oil, 1 teaspoon salt
- Rest the Dough: Cover the tapioca mixture and let it rest for 10 minutes in a warm spot.
- Cook and Mash Potatoes: Meanwhile, peel and cook potatoes in boiling salted water until fork-tender. Mash until smooth.¾ cup cooked russets potato
- Make Dough: To the rested tapioca mixture, add mashed potatoes, nutritional yeast, salt, and garlic powder. 👉 If using vegan cheese, grate it and add it now, but reduce the potato quantity to ½ cup.4 tablespoon nutritional yeast, 1 teaspoon garlic powder
- Knead Dough: Lightly dust a clean countertop with tapioca flour. Transfer the dough and knead until smooth and slightly stretchy. If sticky, lightly dust with more tapioca flour, but don’t overdo it.
- Shape: Now divide the dough into 16 pieces and form them into balls. You can make smaller balls if you like, but the traditional size is a golf ball.
- Shape and Bake: Form dough into 1-2 inch balls and place on an oiled parchment paper or baking sheet. Bake for 30-35 minutes, or until golden brown with a crisp outer shell.
Notes
✔ If the dough is too dry, add 1-2 teaspoon warm water and knead again.
✔ If your cheese bread is hollow, the dough might be too dry or didn’t rest long enough.
Storage:
📌 Fridge: Store in an airtight container for up to 5 days.📌 Freezer: Freeze unbaked or baked pão de queijo for up to 3 months.
📌 Reheating: Bake at 350°F for 5-10 minutes until warm and crispy.


Denys Oliveira says
Forgot to add the stars.
Denys Oliveira says
OMG… this is SO good. And so similar to the original version. Crunchy outside , stretchy inside and cheesy!… I made the version without cheese to have a baseline and will make some experiments from here… adding some funk to it (sauerkraut juice, fermented cashew cheese etc…).
I was scared when I saw the batter - very sticky / liquid. Slowly added more flour until it stopped sticking to my hands.
Very easy, doesn’t make much mess, easy to roll into balls. And delicious.
Thank you!
Patricia Granek says
Hi Denys, thank you so much for the lovely comment! I am so happy to hear that you enjoyed this recipe :0)
Happy baking,
Patricia
Eliza Torgerson-White says
sry i forgot to put 5 stars in my last review, and i had to go and put 5 stars bc it def deserved it!!!!
Patricia Granek says
You are so kind thank you for the update and support! I am so glad you love this as much as we do :0)
Happy baking
Patricia
Eliza Torgerson-White says
these are so yummy!! they look exactly like the picture. i used 1/2 cup of vegan mozzerala and 1/4 cup of vegan cream chees and it worked perfectly!!!!
Eliza Torgerson-White says
could i use vegan philidelphia cream cheese for this?
Patricia Granek says
I have not tried this recipe with vegan cream cheese but I assume it will work well based on the consistency. If you try it I woudl love to hear how it went :0)
Happy baking
Patricia
Alexa says
Super stoked that these pãos de queijo turned out as delicious as those I've been buying, frozen, at a local shop. Because I'm hooked and I was spending more money than I wanted to. Thank you, for sharing.
Patricia Granek says
Amazing Alexa, so glad you like these as much as we do!
Kymber says
I made these and they turned out good, but they weren’t like Brazilian cheese bread ive had in the past. Instead of being bready as well as stretchy/chewy, it was ALL stretchy/chewy on the inside with no “breadiness.” I don’t know if I’m explaining it properly, and maybe it was meant to be that way, but even in your pictures they look “bready” as well as stretchy. So I’m not sure what I did wrong, but we still liked them and ate them. It just didn’t really cure my cravings for the Brazilian cheese bread because the texture was different, lol.
Patricia Granek says
Hey Kymber thanks for the comment! Did you use the potato only version or did you add in cheese. Tradionally Brazilian pao de queijo is chewy and strechy but it does have a little bready like texture (but not like a dinner roll). My guess is that your dough may have beena bit wet or you did not cook them long enough, which can cause a more chewy texture.
Barb says
I was recently introduced to pao de queijo by my Brazilian friend, loved them and wondered if I could make them vegan for my family members avoiding dairy and eggs. And voila here they are! These are excellent. I followed the recipe exactly and they are delicious and so similar to the regular ones.
Next time I am going to try them without the garlic powder so they can be served as another Brazilian friend loves them - with chocolate hazelnut spread. Sounds delish!
Patricia Granek says
Hey Barb! Thank you for such a lvoely comment. I am very interested in the chocolate hazelnut version! You will have to tell us how it goes... it sounds AMAZING!
J says
Giiirrrrrlll, from one Brazilian girl to another, this was AWESOME! I did not experience the sticky, the texture and flavor turned out absolutely amazing and true to the traditional recipe. Loved it. In my opinion, flawless recipe. 🥰🥰🥰
Patricia Granek says
This made my day! Thank you so much for this lovely comment!
Pam says
Amazing!! My toddler loved the vegan cheese balls 🙂 They were a winner in our home. My husband kept going for seconds. We first tried Pao de Queijo at a restaurant called Fogo de Chao in the Washington DC area and I knew I had to make them at home. Finding a vegan option was my mission since my little one has a lactose intolerance. Thanks so much for sharing this delicious recipe!! Can’t wait to try your other vegan recipes! 😁
Patricia Granek says
Thank you so much for this wonderful comment! My kids also love these so I am so happy to hear that your family did as well. Thanks for being here and I hope you enjoy our other vegan recipes too!
Chris says
Dough is way too sticky as written. Adding hot water to the tapioca starch just made it clumpy and harder to work with. Not the consistency you're looking for in a roll. If I made these again I would sharply reduce (or completely eliminate) the amount of liquid and not heat the water and milk. Flavor is the only good thing about this recipe.
Patricia Granek says
Hey Chris, thanks for the comment and feedback. Pao de Queijo is a more chewy type of roll. It wont be like a tadional dinner roll if that is what you are looking for. The dough is very sticky and as I mentioned in the post you can add a bit more tapioca to help it roll out. Please also allow it to rest to absorb the liquid. Glad to hear you liked tha flavor!
Home cook says
The first time I made this recipe, it was perfect. I scaled it up to serve to a crowd and failed miserably, with a too wet, sometimes deflated result. I tried everything to troubleshoot with no success.
Is it possible to retest your recipe using weights? You mentioned how important it is to get the proportions right.
Patricia Granek says
Did you use the vegan cheese or the potato option. Did you ust double everything? I will try to doubel the recipe and weight out the ingredients. I woudl think that the proortions were off. Often times when we double a small increaset can make a big difference. I appreicate your comment and I will update this post soon.
Maiteeny says
Hi, I’m interested in the recipe because I need it to be egg free but not dairy free. Is the main sub here the potato instead of egg? I can still
use cheese instead of nutritional yeast? Also, have you ever tried sweet potato? Happen to have a cooked one in the fridge. Thank you!
Patricia Granek says
Hey! I woudl not recommend using sweet potato for this recipe as it would not have the right consistency or flavor. This recipe, is tradtionally egg-free. I woudl recommend looking up a tradtional pao de queijo recipe if you want to use cheese. The batter for this version is created to be dairy free and so it adds in potatoes and spices to mimic the flavor. Those ingredients wont be necessary if you are using cheese. The cheese of choice is queijo de Minas, but there are some ways to mimic that cheese.
Thanks for the comment and question!
ern says
Have you tried freezing these, either the unbaked dough or the baked balls?
Michelle says
Can this recipe be frozen before being baked? I would like to keep a stash of these and bake as needed.
atmytable says
I have not tried that myself yet but this is a great question. I will make a batch to freeze and update the post. If you have tried it I would love to hear your feedback :0)
Alexis says
How gooey is the inside supposed to be? I cooked mine for 45 min and the inside still seems undone, not sure if thats what they are supposed to be like
atmytable says
It will be gooey but should not taste undercooked. Make sure your batter is not to runny prior to baking these.
Mc says
Can I use just cheese instead of potato or is the potato necessary?
atmytable says
If you are making these with a soft cheese you can just add that and not the potato. However, you must use soft cheese so that it doesn't come out gooey.
Kayla says
Is their a certain vegan cheese brand you use or recommend? There are so many options I never know which one is best.
atmytable says
Yes! I love the one by cuclcherd (pictured and linked above) but you can use any hard vegan cheese. the best results are from a fermented cashew style cheese.
Rikka says
Do you have a vegan cheese you'd recommend?
atmytable says
Yes! I love the one by cuclcherd (pictured and linked above) but you can use any hard vegan cheese. the best results are from a fermented cashew style cheese
Kimber says
For the soft cashew cheese, do you use a commercially available product? If so, can you suggest some brands?
atmytable says
Yes! I love the brand by cuclcherd (pictured and linked above). they are local to Toronto but anything similar will do. I actually changed the recipe to say hard cheese. Anything that is not meant to melt. The best results are from a fermented cashew style cheese
JJ says
What are some examples of vegan soft cheese? Brand? Thx
atmytable says
Yes! I updated the blog post to include more information on this. The best results will come from hard cheese, like a fermented cashew style cheese. Anything that is not meant to melt.
Claire says
Can I use my own home made cashew cheese? I make it with tapioca flour also.
atmytable says
I don't see why not. The texture may vary slightly but try it!! I bet it would be fine. Let me know if you do as I'm curious now 😊
Stephany says
Can you sub tapioca flour for anything else? I have chickpea and all purpose flour on hand.
atmytable says
No unfortunately that is the main ingredient so it's necessary. It's what helps give it that stretchy gooey texture.
chefkreso says
Looks so cheesy and delicious, love it! 😀
atmytable says
Thanks you!!
Lauren says
Those are incredible!! <3
atmytable says
Thank you 😘