Soft, chewy gluten-free bagels with a golden crust—no fillers, no fuss. This foolproof gluten-free bagel recipe is a reader favorite, with great reviews for its authentic texture and easy-to-follow steps. Made with Greek yogurt for moisture and structure, these bagels are perfectly chewy, beginner-friendly, and better than store-bought.

This post may contain affiliate links. The content provided is for informational purposes only and is not intended to serve as medical advice. For more details, please refer to our disclaimer page.
✋🏼E aí, pessoal! Hey there, friends!
Let’s talk about soft, chewy, golden-brown gluten-free bagels. If you’ve tried making them before, you know the struggle—too dense, too dry, or just bread with a hole in the middle.
After years of sitting at family gatherings with dry, frozen gluten-free bagels while everyone else enjoyed fresh, chewy ones, I knew I had to make my own. I tested flour blends, hydration levels, and egg-free options until I found the game-changer: Greek yogurt. It adds moisture, structure, and the perfect chew—without xanthan gum or fillers.
Since then, this reader-favorite recipe has become the go-to for soft, homemade gluten-free bagels that actually taste like the real thing. They’re not just good for gluten-free—they’re just good, period. So good, in fact, that we even made a vegan gluten-free bagel recipe.
Want more foolproof gluten-free bread recipes? Try our pillowy gluten-free Hawaiian rolls or our easy gluten-free cornbread recipe!
😍Why Make This Gluten-Free Bagels Recipe
- 🧡 Chewy & Golden – The texture of a real bagel—soft inside, crisp outside.
- 🥯 Beginner-Friendly – Clear steps so you get it right the first time.
- 🚫 No Xanthan Gum – Greek yogurt keeps them moist without fillers.
- 🌾 Easy to Find Gluten0Free Flour Blend – No all-starch mix—just balanced, nutritious ingredients.
- 💡 Tested & Foolproof – No dry, dense bagels—just the perfect bite.

🤔What Gluten-Free Flour Works Best ?
Not all gluten-free flour blends work the same. Too much rice flour = dry, dense gluten-free bagels. Too much starch = gummy, flat ones. After testing different blends, I found that the best results come from an all-purpose gluten-free mix with bean, tapioca, and potato flours—like Bob’s Red Mill Gluten-Free Flour (not sponsored). Here’s why it works:
- Garbanzo Bean Flour – Adds flavor and protein for structure.
- Tapioca Flour – Brings chewiness and browns the crust.
- Potato Starch – Lightens the dough for a tender crumb.
- Sorghum Flour – Helps mimic wheat’s texture with a mild taste.
- Fava Bean Flour – Adds protein and body, similar to garbanzo.
Note: This flour blend doesn’t contain xanthan gum. Instead, we rely on other ingredients to help get that chewy texture, like Greek yogurt!
🥯 Ingredients & Flavor Notes:
Each ingredient plays a key role in creating soft, chewy gluten-free bagels with the right texture and flavor. Here’s why they matter:
👉 Want to skip ahead? Jump to the Recipe
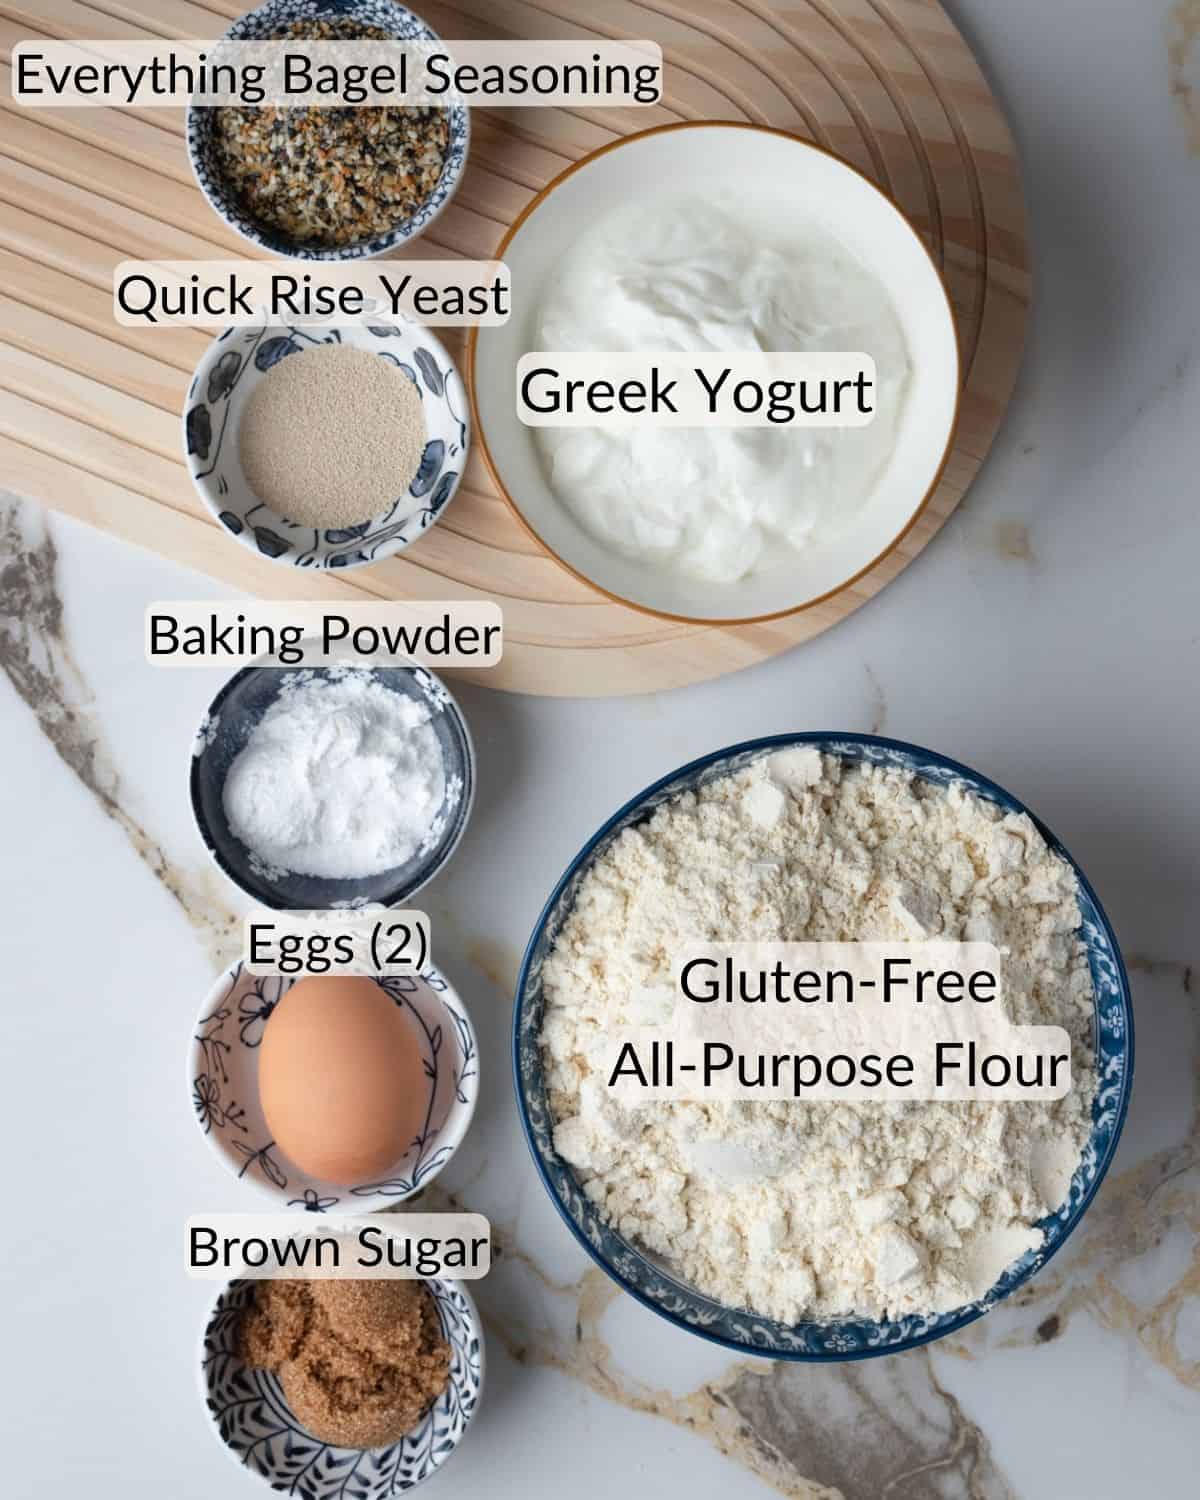
- All-Purpose Gluten-Free Flour: This recipe was tested using Bob's Red Mill AP Gluten-Free Flour, which provides structure without being too heavy. The mix of bean, tapioca, and potato flours helps mimic the chewiness of traditional bagels (see flour breakdown for more).
- Greek-style Yogurt: The secret to moist, tender bagels. It adds protein, binds the dough, and improves elasticity.
- Quick Rising Yeast: Speeds up the process, giving the dough its signature rise and airy texture.
- Sugar: A touch of sweetness to activate the yeast and balance the flavors.
- Baking Powder: This gives that extra lift to make our gluten-free bagels light and airy.
- Eggs: Help bind the ingredients together, adding to the chewiness without the need for gluten.
- Everything Bagel Seasoning: The ultimate topping! Make sure it is certified gluten-free if you have celiac disease.
- Salt: Enhances the taste because every good gluten-free bagel needs a pinch of saltiness.
- Large Pot of Boiling Water: The key step to achieving that iconic bagel chewiness and crust.
- Molasses or Brown Sugar for Boiling Water: This not only adds a subtle sweetness but also that glossy, inviting finish.
For full quantities, see the recipe card at the end of this post.
⚠️ Celiac Safety Tip: Even if an ingredient is naturally gluten-free, it can still be cross-contaminated during processing. Stick to brands that are certified gluten-free and processed in a dedicated GF facility, especially for your flour mix and spices. Some quick-rise yeasts contain wheat starch—always check the label.
🔁Ingredient Substitutions
Need to swap an ingredient? Here are some easy alternatives for making your gluten-free bagels recipe without sacrificing flavor or texture:
- Gluten-Free Flour Blend Alternative: I recommend the specified mix, but if you need an alternative, use an all-purpose gluten-free blend with similar ingredients like garbanzo bean flour, tapioca flour, and potato starch.
- Baking Powder Alternative: Out of baking powder? A mix of cream of tartar and baking soda works as a substitute.
- Vegan Alternative: For a vegan or dairy-free option check out our vegan gluten-free bagels.
- Everything Bagel Seasoning: Get creative with toppings—try sesame seeds, poppy seeds, dried garlic, onion, sea salt, or enjoy them plain!

👩🏽🍳Step-By-Step Instructions
Important Prep Tip: For the best texture, all ingredients should be at room temperature. Cold ingredients can slow the yeast and lead to dense gluten-free bagels. If needed, microwave yogurt for 15–20 seconds to warm it up.
Step 1: Activate Yeast
The main reason we use active versus instant yeast in this recipe is to prevent a recipe from failing due to dead yeast! So, the first step is to activate your yeast in a bowl of warm water mixed with 1 tablespoon of sugar. Sprinkle in the yeast, stir, and let it sit for 5–10 minutes until frothy—this confirms the yeast is active and ready to work.
Troubleshooting Yeast: Frothy & bubbly? The yeast is alive. Flat & lifeless? It may be expired or water was too hot/cold.
Step 2: Prepare Wet Ingredients
Whisk Greek yogurt and eggs in a bowl. This keeps the gluten-free bagels moist and helps with rise. Ensure the mixture is at room temperature so it doesn’t slow the yeast.

Step 3: Mix Dry Ingredients
In a large mixing bowl, whisk together the gluten-free flour, baking powder, and salt.
Step 4: Bring the Dough Together
Pour the yeast mixture and yogurt-egg blend into the dry ingredients. Stir with a spoon until well combined. Continue to mix for 2-3 minutes to help incorporate air into the mixture and ensure you get light, fluffy, gluten-free bagels in the end.
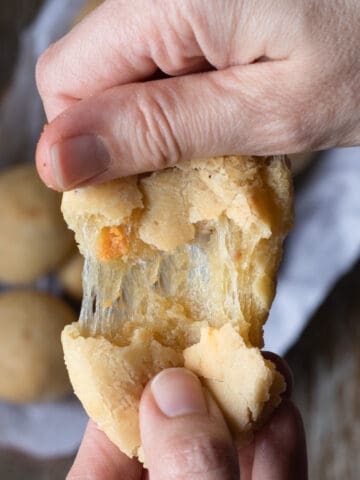
💡 Texture Check: The dough will be sticky and slightly wet—this is normal for gluten-free dough.

What Should the Gluten-Free Dough Look Like? Aim for a texture that's slightly sticky but firm enough to hold its shape. Unlike traditional wheat dough, it won't be elastic and will look wet and not crumbly. This consistency ensures your bagels will rise nicely and have that desirable chewy texture once baked.
Step 5: Proof the Dough
Grease a large bowl, place the dough inside, cover, and let it rise for 1–2 hours in a warm spot. It should double in size before the next step. If your kitchen is cold it may take longer so look for a warm spot.

Step 6: Shape the Bagels
- Lightly dust a surface with 2 tablespoon of gluten-free flour and turn out the dough.
- With floured hands, lightly bring together the dough into a ball.
- Then divide into 6 equal sections (you can use a scale or ruler).
- Roll each into a ball, then poke a hole in the center with your finger to shape into a bagel.
💡 Tip: Gluten-free dough is stickier then traditional dough, if possible avoid adding extra flour. However if your dough turns out way to sticky add 2 tablespoon of flour at a time—but don’t overdo it, or the gluten-free bagels will turn out dry.

Step 7: Second Rise
While you prep the next step, let your shaped bagels rise for another 10 minutes. This isn't a critical step but it will help puff up each bagel creating a fluffy texture.
Step 8: Preheat & Boil Bagels
Meanwhile, preheat your oven ready at 400°F (200°C). Then bring a large pot of water to a boil and add 1 tablespoon brown sugar—this creates the signature bagel crust. Gently lower each bagel into the boiling water. Boil for 30 seconds per side, then use a medium-sized sieve or slotted spoon to transfer to a parchment-lined baking sheet.
💡Boiling Tip: If your gluten-free bagels are falling apart you may have over proffed them. Knead them gently, reshape and try again.
Step 9: Add Egg-Wash and Toppings:
Into a small bowl, add one egg white (or olive oil) and 1 teaspoon of salt. Then, brush the tops of each gluten-free bagel. While they're still wet, sprinkle your gluten free bagels with the everything bagel seasoning or sesame seeds. It'll stick nicely and add that irresistible flavor.

Step 10: Bake:
Bake until golden brown, about 20-25 minutes and then let it cool for 10 minutes. This gluten-free bagel recipe is best enjoyed fresh on the day!


💡 Recipe Tips For The Best Texture
Getting chewy, golden-brown gluten-free bagels comes down to technique. Here’s how to get it right every time:
- Check Your Yeast – If it doesn’t froth after 5–10 minutes in warm water with sugar, it’s dead. Use fresh yeast for a good rise.
- Use Room-Temp Ingredients – Cold yogurt or eggs can slow the yeast and make the dough harder to work with.
- Dough Should Be Sticky, Not Dry – Gluten-free dough isn’t like wheat dough. If it’s too wet, add 1 tablespoon flour at a time—but don’t overdo it, or the bagels will be dense.
- Let the Dough Fully Hydrate – Resting the dough helps moisture absorb evenly and improves texture. Always let it rise in a warm, draft-free spot.
- Boiling = Chewy Crust – Don’t skip this! A quick boil in molasses or brown sugar water gives bagels their signature chew and glossy crust.
⏲️ Meal Prep This & Storage Tips
Save time with these quick prep tips for making our gluten-free bagels recipe:
- Make Dough in Advance – After the first rise, cover and refrigerate overnight. Let it sit at room temp for 1 hour before shaping and boiling.
- Store Baked Bagels – Keep your gluten-free bagels in an airtight container at room temperature for up to 2 days or refrigerate for up to 5 days to extend freshness.
- Freeze for Later – Once cooled, place bagels in a freezer-safe bag and store for up to 3 months. Label with the date for easy tracking.
- Best Reheating Method – For a softer bagel, microwave for 10–15 seconds before toasting to prevent drying out. Then, toast your homemade gluten-free bagels for the best texture. If frozen, no need to thaw—just add extra toasting time.


As a busy mom of three kids and a longtime food blogger, I’ve spent over a decade perfecting recipes that taste great for everyone in my mixed-diet households. So, flavor and texture are always my top priorities. This recipe is one of my family's favorite recipes, and I hope it becomes a hit in your home, too!
❔Recipe FAQ
This could be due to inactive yeast (always checking the expiration date), using cold ingredients that slow yeast activity, or not allowing the dough to rest in a warm enough spot. Ensure your yeast froths up after mixing with warm water and sugar as a sign it's active.
Gluten-free dough can be trickier to judge by texture. If it's too sticky, add a little more gluten-free flour blend, a tablespoon at a time. If it's too dry, mix in a teaspoon of water at a time until you reach the desired consistency. Check out the photo in the instructions section.
Dense gluten free bagels can result from not allowing the dough to rise sufficiently, from having a dry dough, or from overworking the dough. Ensure the dough has doubled in size during the first rise. Don't add to much extra flour when kneading, and handle it gently when shaping.
🌟 Loved our gluten-free bagel recipe? Let us know! I’d be thrilled if you could leave a comment, star rating, or share this recipe. Your feedback helps support and improve AtMyTable and helps others discover new favorites. Or come chat with me on Facebook or Instagram!
🥣Recipe Pairing & More
Our fresh Brazilian Vinaigrette salsa is amazing as a bagel topping! Or try our dairy-free ricotta for a protein boost!


👋🏼Até logo, amigos! Keep savoring every bite of this gluten-free bagel recipe and don’t forget—life’s better with a little flavor and fun. Até a próxima!
📖 Recipe

Soft & Chewy Gluten-Free Bagels
Ingredients
- 8 grams instant yeast certified gluten-free
- ¼ cup warm water
- 1 tablespoon sugar
- 1 cup Greek yogurt room temperature
- 2 egg room temperature
- 2 ¼ cups all-purpose gluten-free flour Bob’s Red Mill recommended
- 2 teaspoon baking powder
- 1 teaspoon salt
For Boiling Bagels
- large pot of water for boiling
- 1 tablespoon brown sugar or molasses (for boiling water)
Extras
- 1 egg white for egg wash (or olive oil)
- 2 tablespoon everything bagel seasoning
Instructions
- Activate Yeast: In a small bowl, mix ¼ cup warm water with 1 tablespoon sugar. Sprinkle yeast and wait for it to froth (5-10 mins).8 grams instant yeast, 1 tablespoon sugar, ¼ cup warm water
- Prepare Wet Ingredients: Whisk your room-temperature Greek yogurt and eggs in a separate bowl.1 cup Greek yogurt, 2 egg
- Mix Dry Ingredients: Combine gluten-free flour, baking powder, and salt in a large bowl. Mix well.2 ¼ cups all-purpose gluten-free flour , 2 teaspoon baking powder, 1 teaspoon salt
- Combine Wet and Dry: Add the yeast and yogurt-egg mixture to the dry ingredients. Mix with a spatula for 2-3 minutes. The dough will be very wet at first then come together. It will still be slightly sticky (see image in post) once combined, which is normal for making gluten-free bagels.
- First Rise: Grease a glass bowl with some olive oil, add the dough then cover and let rise in a warm spot. It is ready once it doubles in size, about 1-2 hours, depending on your kitchen temperature.
- Place Dough Onto Floured Surface: Dust a surface with 2 tablespoon of your gluten-free flour. Turn out the dough and, with floured hands, shape it into a log. Divide it into 8 equal portions.Dough Texture: Your dough will be sticky. Use floured hands to shape it, and try to avoid adding extra flour. If it is way too sticky to handle, add 2 tablespoon of flour at a time until it comes together.
- Shape Dough: Roll each piece of dough into a ball. Place them onto a parchment-lined baking sheet. Then, use your finger to make a hole (¾ inch wide) in the middle.
- Quick Second Rise: While you prep the water bath, let your shaped bagels rest for 5 minutes. This will help them puff back up.
- Boil for a Chewy Crust: Preheat your oven to 400°F (204°C). Then, bring a large pot of sugar water to a boil. Drop bagels in one at a time and boil for 30 seconds per side. Remove with a slotted spoon.Boiling Tip: If your bagels fall apart, they may have been overproofed. Re-roll them to remove some of the air.large pot of water for boiling, 1 tablespoon brown sugar
- Egg Wash & Toppings: Brush bagels with egg white or olive oil, then sprinkle with Everything Bagel Seasoning.1 egg white
- Bake: Bake for 20-25 mins until golden brown. Cool for 10 minutes before slicing.2 tablespoon everything bagel seasoning
Notes
- Fridge: Store bagels in an airtight container for up to 5 days.
- Freezer: Once cooled, freeze in a zip-top bag for up to 3 months.
- Reheating: Toast straight from the fridge/freezer, or microwave for 10–15 seconds before toasting.


Vera P. says
Best gluten free bagel recipe! I haven't made bagels in 6 years and last time I did, they were not gluten free. I was worried this recipe would make dough that was too wet to roll into a log but it was perfect! This is exactly what I was looking for.
Patricia Granek says
Hi Vera,
Thanks so much for the lovely comment. I am so happy to enjoyed these bagels! They are my families favorite too, you can also experiment by adding different toppings when you want a little change, our favorite is garlic and salt or a little cheese.
Happy baking
Patricia
Maya says
Hi. Can I mix everything in the mixer?
Patricia Granek says
Hey Maya,
You can try with a mixer, it may work well as it will help mix everything up well. I know a few other recipes use a mixer, my preference has alwasy been by hand so I can feel the conisistency of the dough.
Patricia
Maya says
Hi, we are new to Celiac and my daughter’s favorite food is bagels.
In my first try, the bagels came out great and tasty.
One question, can all the ingredients be mixed in the mixer? - I found it quite hard to bland all the ingredients into a dough (I doubled the amount).
Michelle says
My 12 yo daughter was just diagnosed with Celiac disease, so she KNOWS what a gluten-full bagel tastes and feels like. I just tried this recipe out today and followed it to a T, she is shocked, and so am I... we LOVE them. I am over the moon that I can easily, and way more cost effectively give her a bagel option! Thank you!!!
Patricia Granek says
Hi Michelle,
Thank you so much for the lovely comment and I am so happy to hear your daughter loves this recipe. I had a similar reaction when I finally got this recipe right so I am thrilled to hear you are all enjoying it.
Happy baking
Patricia
Donna says
Best written out recipe ! I love that you added the ingredient amounts in the directions so that I didn’t have to keep going back to double check the amounts. I can’t way to try this one out!! Thank you!
Patricia Granek says
Hey Donna,
Thank you for the lovely comment and I am happy you like the ay the recipe is written! I appreciate that feedback as I am alwasy looking for ways to make my recipe card helpful and not to long!
Patricia
Anonymous says
My dough was very sticky and fell apart in the water. I’ve seen other comments where you mentioned weighing all the ingredients however the recipe doesn’t have any weights on it. Do you have weight measurement for this recipe?
Patricia Granek says
Hey,
Thank you for pointing that out! I think the recipe card reverted to an older version. I will update this with the weights as soon as I can!
Thanks again,
Patricia
skye says
is it 2 & 1/4th cup flour or 2, 1/4th cup of flour
Patricia Granek says
Hi Skye,
It's 2 AND 1/4 cups of flour ;0)
Happy baking
Patricia
Sarah says
These bagels are absolutely delicious! My dough didn’t double on the first rise even though I let it rest for 2+ hours but it still turned out perfectly! I am so excited to have a GF bagel option! I have been craving a bagel ever since going GF 3 years ago. Thanks again for this great recipe.
Patricia Granek says
Hey Sarah! Yes so happy to hear you love these as much as we do! I tested this recipe a bunch and remember being so excited for good bagels again! You can also switch up the spice and flavors you add in, i love adding a bit of cheese or some minced garlic on top before baking. Gives a nice variation when you want to kick things up a little ;0)
Happy Baking,
Patricia
Shelby says
I followed the recipe perfectly even using the flour brand recommended, my dough doubled beautifully after an hour and everything but when I turned it out onto the counter it was such a sticky mess even after adding 8 extra tablespoons of flour it was still impossible to work with due to being so sticky and loose. I added another heaping scoop of flour and am going to let it rise again but I'm not hopeful. I'm so disappointed! Any idea how to save it?
Patricia Granek says
Hi Shelby, I am so sorry to hear this, did you weight the flour?
Cindy says
Best GF bagel recipe. Only problem with this recipe is that my husband refuses to eat GF bagels from the store. And I am cooking these every week!!!!
Patricia Granek says
Hi Cindy! Thank you so much for your lovely recipe. This is so wonderful to hear, and I am sorry that you are now the families bagel baker lol!
Cheer,
Patricia
Anne says
Hi - Is it possible to use a dairy free yogurt as a substitute? We do not need vegan, just gluten free and dairy free. Thank you!
Patricia Granek says
Hello, yes i have actually made them with dairy free yogurt many times. I perfer not duing daya (as the texture affets the rise). You can check out our vegan version to see what the batter woudl look like https://at-my-table.com/gluten-free-vegan-bagels/
Isabel says
I tried this in the UK, with freee plain flour. Followed the recipe but the dough was so sticky and wet I kept having to add more flour after I had proved the dough. They look okay but are very dense and hard, not the nicest to eat. Where did I go wrong.
Patricia Granek says
Hello Isabel,
Glad you liked the taste but sorry about the texture. Did you use a scale? I recommend weighing all the ingredients. What brand of flour did you use?
Jorge says
I love this recipe, especially the way you laid it all the steps. So easy to follow!
Patricia Granek says
Hey Jorge, I am happy to hear you like this recipe and the steps are clear and easy to follow!
JJorge says
I love this recipe, especially the way you laid it all the steps. So easy to follow!
Dave L says
My recipe comments and volumes were for making 12 bagels. I love that you can choose sizes for the recipe and it adjusts ingredients. Thank You
Meghan S. says
This was my first time making gluten free bagels and they turned out so perfect! I am so happy, I will be making these forever. 10000000/10 would recommend.
Patricia Granek says
Hey Meghan! I am so gald to hear you loved these! Thanks so much for such a lovely comment and sharing our thoughts on this recipe :0)
Dave L says
This is by far the best recipe and baking instructions. This is easily the 10th recipe I have tried. They are awesome. I used Bob's 1 to 1 GF Flour and I substituted 1/2 C of Sorghum Flour and 1/4 C Flaxseed. I also used 3/4C of Whole milk Buttermilk and 1/2 C plain yougurt for Greek Yogurt. Crunchy, chewy!! The best.
One confusing part -Instructions say use one egg yolk for wash. Printed list says egg white?
Patricia Granek says
Hey Dave, thanks for such a lovely comment. I ams o happy to hear you love this reciep as much as wel do! We initally had the used the entire egg, then switched to the yolk but ultimately landed on using just the eggw hites for the wash, so we must have missed that in the instructions. Just corrected it thanks! Also love your addition of the sourghum, i love the flavor that flour brings and I am happy to hear the recipe held up with this sub, and the additon of the buttermilk. I will have to try this version myself!
Ashley says
We love this recipe! I’ve made it multiple times now and my gf kiddo loves them. I would like to alter it slightly to make a cinnamon raisin bagel , do you have any advice on the best way to do that? I tried someone else’s recipe for those and it just made me wish I’d tried to do it with this one instead.
Patricia Granek says
Hey Ashley, thanks so much for the lovely comment. These are our families favorite too! If I where to make these cinnamon rasin bagels, I would add the connamon in with the drt ingredients (about 1 tbsp) and then sprinkel some over the tops after boiling. As for the rasins I woudl add them into the batter when mixing the wet and dry. My only cavet woudl be that if you add to many rasinins it may weight down the dough, but you coudl start with 1/4 cup and increase if you make them again. Let me now how they turned out! I might have to go test that as a recipe myself, it soudns delish!
Chris K. says
I haven't made it yet, I was wondering can you put the ingredients in a bread machine to do all the mixing, etc. then take out the dough before it starts baking and continue with rest of the steps?
Patricia Granek says
Hey Chris, I have not tried adding it all to a bread machine so I am not sure. I imagine you may need to adjust the amount of liquid you use but again I woudl have to test this. Woudl love to hear how it went if you try it.
Hannah-Lee Anderson says
This recipe fell apart as soon as i Put it into the water. I also used a whole 1.5 cups extra flour cus it was so sticky and soppy.
Patricia Granek says
Hey Hannah, so sorry to hear that! I woudl love to try and help! What flour did you use? And how long did you rest the dough. Sometimes over resting can cause to many air bubles and that woudl give you a very sticky, sloppy dough. If you had to add an extra 1.5 cups of flour my initial thought woudl be that you might have used a different flour?
Shelley says
love this recipe like before I wrote changed out yougart for sourcream added chunks of cheese in dough and cheese on top, this time I ran out of sourcream and made up the measure with cottage cheese. Instead of making bangles I formed hotdogs buns the only problem I had was removing the buns from the boiling water without breaking. Will need a bigger scoop. I recommend this even for the none gluten free family
Patricia Granek says
Hey Shelley, what fun modifications! I am so glad to hear it worked with those sub. I will defienlty be trying this myself!!! And the hot dog buns too... I actually used a large mesh strainer when I made burger buns with this recipe. It wokred great.
Thanks for the lovely comment! We are working on developing a gluten free dinner rolls at the moment :0)
tkersh says
Thank you so much for this recipe! My wife loves bagels and hasn't been able to have them (except the frozen kind) for years so I'm making this for her for New Year's. Can you tell a little bit more about the purpose of kneading since it's usually to strengthen gluten and most rising dough GF recipes are fragile and say to avoid it? Is it mostly for shaping in this case? Thanks!
Patricia Granek says
Hey, yes gluten free dough is usually very fragil so for this recipe it is recommended to just carefully knead it so it comed together only. You dont want to over knead which can result in a flat bagel at the end. So You are correct to just do it so you can bring the dough together then shape it. I hope your wife loves these. We make a batch almost weekly and i developed this recipe for the exact same reason! I was tired of eating frozen hard bagels!
Shelley says
I have made these a few times now with a few changes love the texture and flavor but was wondering has anyone made them into a bagel bun no hole?
Patricia Granek says
Hey Shelley, thats so great to hear and I am glad you like them. Woudl love to hear about the changes or variations you have tried :0) I have made them without the holes and they work out ok. We had them as hamburger buns, my only comment is that without the hole its a tad tricker to get the center to cook without making them dry.
Denise H says
I purchased a GF flour that has Xanthan gum in it because, as far as I know, I don't have sensitivity to it. To your knowledge, is there any knind of adjustment that I need to make to the recipe?
Patricia Granek says
Hey Denise,
No adjustment needed! We tested this recipe with bobs red mill 1-1 flour (which has xantham gum in it) and it turned out great as well). Just pay attention to the hydration of the dough but otherwise you shoudl get similar results.
Happy Baking!
Amanda says
Hi! It seems like in your writing you call for egg whites in the bagel and to use the yolks as a wash. Then in the recipe below it says to use whole eggs in the bagel dough and an egg white for the wash. Can you clarify which is best? Thank you!
Patricia Granek says
Hey Amanda, thanks for pointing this out. I have gone ahead and correct it to use the whole egg. We tested this recipe both ways and found that adding the entire egg produced better bagels. I missed the edit int he post when we updated our recipe. Thanks again!
Melissa says
Have you tried this with King Arthur GF bread flour?
Patricia Granek says
We havent tested this recipe with King Aurthur but that mix has similar ingredients to the Bob's 1-1 GF flour mix so it shoudl give you good results. Just be sure to focus on hydrating the flour, so check the photos to get the same consistency and wetness.
Happy baking!
Patch says
Great texture and flavor. It stores well and is easy to make!
Shelley says
I just made these and they are very good. I sub the yogard with sour cream, I also added cheese and jalapano and cheese on top.
Will make them many more times thanks for the recipe.
Patricia Granek says
Oh that sounds so delicious!! I will definetly have to give that a try!
Noemi says
Hi, I have a question for you unfortunately I have to order online that kind of flour that comes up for this recipe but have you ever tried the blue bag same company one-to-one baking flour GF
Patricia Granek says
Hey Noemi, yes i actually tested this recipe with the bob's red mill 1-1 (blue bag). It does work but you may have to adjust the amount of water you add in. It truns out slightly drier but you shoudl still get a tasty gluten-free bagel :0)
Shannon Graves says
Overall the recipe turned out pretty good! It's the only one my NJ native fiancee actually likes. I've had some issues with the crumb being sticky, so I did some digging. The recipe calls specifically for Bob's Red Mill 1-to-1 Gluten-Free Flour, but also says this recipe is xanthan gum-free... but this specific flour does have xanthan gum. Are you perhaps referring to the Bob's Red Mill All-Purpose Baking Flour?
Patricia Granek says
Hey Shannon, I think there may be some confusion. This recipe specifically calls for the all purpose gluten free flour mix which does not contain xantham gum. If you decide to use the 1-1 mix it will have xantham gum in it. I am so gald to hear your finacee enjoyed this recipe :0)
Alanna says
Can you please advise if its 1/4 cup of water or 1/2 cup... the recipe list says 1/4 and the directions say 1/2.
thank you
Patricia Granek says
Hey Alanna, thanks so much for this comment, I have corrected the steps to refelct the list. I also updated the recipe notes since we have now tested this recipe by adding the yeast in as a dry ingreedients, one less step!
Josh Granek says
Big win! So nice to see such a great recipe without all those aggravating fillers. Great work!